Every scrapbooker I know has an obsession. Some collect buttons, glimmer mists or brads, others hoard punches, flowers or ribbons. MY obsession is paper. Every time I enter a scrapbooking store, I loose all common sense when I get anywhere close to paper. This is actually the one scrapbooking goodness that made me fall in love with scrapping. Beautiful papers and I have a long term relationship.... I love the textures, the colours, the patterns, and they all seem unique to me!
Which can be problematic when the time comes to use them. I am afraid of cutting them, 'hurting' them, even opening a new paper pack feels like a sin to me. I have paper packs that I bought over a year ago that remained untouched. So this weekend, I took one of these leap of faith I was holding on to, and opened TWO brand 'new' packs, nothing less! Not so new in fact, as I am talking about 'Out of Print' from Basic Grey, and 'Et Cetera' from BoBunny. Some of my friends went through 2-3 entire packs each of Et Cetera in the last year, while I watched them, 'envy' them for having the 'strength' to open their paper packs and use them! I admit, I have issues.... :)
So by deciding to open these two pretty paper packs, I also committed to make one of the nicest layouts I ever made. I was not going to be broken hearted and regret this ultimate decision!
Here is the double page layout I made using papers from both collection (Out of Print and Et Cetera), as well as 2 pages of the beautiful 'French Kiss' collection from Glitz for the background page.
I love the romantic atmosphere that transpires in this layout, the colours and the multiple layers of paper I created. Here is a close-up of page 1.
As I often do, I distressed and aged the paper using distress ink and stain to give it a vintage look. I also made an opening in the corner where flowers are peeking out, as if they were growing behind the paper.
Here is a close-up of page 2. This page took quite a few hours to create, as my head was blooming with ideas! I wanted to create a multi-layered layout because it makes me used many of the papers I like, but just in small pieces so I am left with plenty to use on other layouts! This is perfect for the paper lover that I am...
I painted swirls on one of my canvas butterflies (Maya Road) using glimmer glam (Tattered Angels), which I also sprayed with glimmer mist from the same company.
Of course, I couldn't create such a romantic layout without putting one of my favorites elements: the Tim Holtz keys are also one of my obsessions, that I preserve and use only on very special layouts or cards...
I hope you enjoyed this post. Please feel free to leave a comment, and share what YOUR scrapbooking obsession is!
Thanks for stopping by!

Monday, March 19, 2012
Wednesday, March 7, 2012
New DT projects
Last week, my Diva friends and I attended a crop in Dixon's Corner. We had a lot of fun and we created in a very relaxed atmosphere. This was a good place for me to be at the time, because I was tasked, as a design team member for Tina's Scrapbooking Creations, to create layouts with some paper collections that do not correspond to my usual style; I named Karen Foster design hockey paper collection and Imaginisce Hippity Hop paper collection.
So, I had to think outside the box... to say that I was out of my comfort zone is an huge understatement! To boost my inspiration, I picked some of my favorite pictures of the kids. Here is what I created with the hockey paper.
Since I just love working with corrugated cardboard, I used plenty of it on this layout to give it a boyish and grungy look. I used black shinny cardstock that kind of gives a icy look to the background. I like the final result! This is more 'me' than I expected when I started working on it.
The second layout I made is a single page of my little sweetie when she turned 3 years old. She received a cute raincoat and hat outfit from my Mom for her birthday and played that 'going on a trip' game. Using some of the Imaginisce Hippity Hop paper and white dotted cardstock, I created a girly and childish looking layout.
I stamped here and there around the page using a Tim Holtz stamp to create some kind of a frame to the layout. I like the result, but it really forced me out of my comfort zone. I'm happy I made it as my daughter likes it very much.
Thanks for stopping by!
So, I had to think outside the box... to say that I was out of my comfort zone is an huge understatement! To boost my inspiration, I picked some of my favorite pictures of the kids. Here is what I created with the hockey paper.
Since I just love working with corrugated cardboard, I used plenty of it on this layout to give it a boyish and grungy look. I used black shinny cardstock that kind of gives a icy look to the background. I like the final result! This is more 'me' than I expected when I started working on it.
The second layout I made is a single page of my little sweetie when she turned 3 years old. She received a cute raincoat and hat outfit from my Mom for her birthday and played that 'going on a trip' game. Using some of the Imaginisce Hippity Hop paper and white dotted cardstock, I created a girly and childish looking layout.
I stamped here and there around the page using a Tim Holtz stamp to create some kind of a frame to the layout. I like the result, but it really forced me out of my comfort zone. I'm happy I made it as my daughter likes it very much.
Thanks for stopping by!
Tuesday, February 28, 2012
The Clan Noreau
My father was from a large family... There was ten of them, not counting the ones who died very early in life. From what I can remember, it was not so unusual to have them all together on Christmas time, when I was young. But as years went by, it became more and more difficult for them to meet. In 2004, as we celebrated on a many 50th wedding anniversaries, we were finally able to have them all together and take a memorable picture. Of course, two were no longer of this world, but we were happy to capture this unique moment with all the ones who were present with their spouse. Since then, six left for the other world, and among them, my dear father.
I was lucky enough to get a copy of this beautiful picture. For the longest time, I didn't know what to do with it... until I finally got inspired! So I created a very vintage looking layout to surround all these people that I loved and still love with all my heart.
I had a real pleasure creating this layout, and I did it as part of a design team project for Tina's Scrapbooking, using the beautiful Printery paper collection (Prima Marketing). I created flowers out of glassine paper (Tim Holtz), using glimmer mist, distress stain and distress ink to give them the exact colour I wanted. I particularly worked hard on the cream one as I didn't have the exact shade of glimmer mist I needed. Plus, glassine doesn't take colour very well, so I had to ink, stain and mist intensively to get this result. I love the vintage look I got in the end.
A couple of months ago, my brother, who recently re-decorated his house with new curtains, wall paper, etc., brought me a nice loot of goodies: textile, ribbons, beautiful curtain ties and loads of wine labels! Just breath taking! I decided to use a piece of curtain tie, along with this gorgeous lace I had laying around for months, to create a nice border. I punched and distressed two little butterfly, and voilĂ !
Finally, one of the sheet in the Printery collection had letters all over it, allowing me to create a 'family crest'. I cut around the N and used gold acrylic paint to put more emphasis on the letter, and the edge of the crest. I covered it with a thick layer of Tim Holtz Glossy Accent.
Of course, I put this crest close to my dear Papa, as he was so proud of his family. And I am so proud of who he was...
I hope you like this new layout!
Have fun scrapping!
I was lucky enough to get a copy of this beautiful picture. For the longest time, I didn't know what to do with it... until I finally got inspired! So I created a very vintage looking layout to surround all these people that I loved and still love with all my heart.
![]() |
| Le Clan Noreau |
A couple of months ago, my brother, who recently re-decorated his house with new curtains, wall paper, etc., brought me a nice loot of goodies: textile, ribbons, beautiful curtain ties and loads of wine labels! Just breath taking! I decided to use a piece of curtain tie, along with this gorgeous lace I had laying around for months, to create a nice border. I punched and distressed two little butterfly, and voilĂ !
Finally, one of the sheet in the Printery collection had letters all over it, allowing me to create a 'family crest'. I cut around the N and used gold acrylic paint to put more emphasis on the letter, and the edge of the crest. I covered it with a thick layer of Tim Holtz Glossy Accent.
Of course, I put this crest close to my dear Papa, as he was so proud of his family. And I am so proud of who he was...
I hope you like this new layout!
Have fun scrapping!
Monday, February 20, 2012
She's all that...
I wanted to create a cute layout of my preteen girl that would be feminine, sophisticate but not to old for her age. My daugther loves scrapbooking and she is especially very keen on knowing how I created certain elements, whether it is a flower, a crafty boarder or anything I made from scratch.
I had these amazing canvas butterflies from Maya Road for quite a while, and wasn't sure how and where to use them. Of course, doing a layout about my daughter inspired me... So here is what I did with one of them.
I layered a lot of glimmer mist, and I top coated it with Maya Mist in Silver Plated. I love this product! I then added some pearls (perfect pearl) and used glimmer glam to colour them (many different colours). I placed a pretty Prima flower to enhance the beauty of the butterfly.
I made another butterfly for the other page, but a pink one. I painted swirls all over the canvas with Chandelier glimmer glam to create a resist and spayed Party Pink glimmer mist on top. The resist effect worked, but the swirls were so pale that I re-painted them with Pearl acrylic paint (Adirondack). Here is the result...
To add a bit of relief, I created a border with a few stripes of paper and one of my favorite border punch (Fiskar); I used foam squares to attach it to the layout.
So here is the end result:
I used a very girly yet sophisticate looking paper collection - Posh - from Theresa Collins. It was love at first sight between this paper and I and I knew I would use it for my daughter! The letters I used are from BasicGrey and I misted them with Snow White Maya Mist for an iridescent look. Since I did this layout at a crop, I didn't have a wide choice of letters. I find them a little overpowering for the layout... but at the same time, they give a little childish look to the whole layout! So I like it!
Thank for reading!
I had these amazing canvas butterflies from Maya Road for quite a while, and wasn't sure how and where to use them. Of course, doing a layout about my daughter inspired me... So here is what I did with one of them.
I layered a lot of glimmer mist, and I top coated it with Maya Mist in Silver Plated. I love this product! I then added some pearls (perfect pearl) and used glimmer glam to colour them (many different colours). I placed a pretty Prima flower to enhance the beauty of the butterfly.
I made another butterfly for the other page, but a pink one. I painted swirls all over the canvas with Chandelier glimmer glam to create a resist and spayed Party Pink glimmer mist on top. The resist effect worked, but the swirls were so pale that I re-painted them with Pearl acrylic paint (Adirondack). Here is the result...
To add a bit of relief, I created a border with a few stripes of paper and one of my favorite border punch (Fiskar); I used foam squares to attach it to the layout.
So here is the end result:
I used a very girly yet sophisticate looking paper collection - Posh - from Theresa Collins. It was love at first sight between this paper and I and I knew I would use it for my daughter! The letters I used are from BasicGrey and I misted them with Snow White Maya Mist for an iridescent look. Since I did this layout at a crop, I didn't have a wide choice of letters. I find them a little overpowering for the layout... but at the same time, they give a little childish look to the whole layout! So I like it!
Thank for reading!
Tuesday, February 14, 2012
Crafty Valentine's Day!
Every Valentine's Day, I carry on with my tradition of making my own handmade cards for my immediate family... my hubby, Alyssa and Nico always receive Valentine's card made with love.
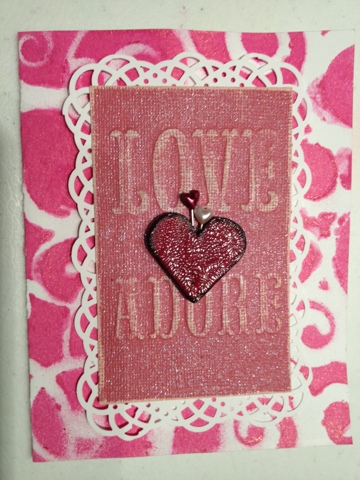
This year, I used more glimmer mist than I did previously. All three cards are misted in the front and the back, using the same mask for the kids' cards. For all three cards, I used little hearts from Maya Road 'love mini chipboard set' that I inked, misted, and then covered with one of my faves: Rock Candy Distress Crackle Paint from Tim Holtz.
So here is Alyssa's card... an ultra feminine look for a super girly girl! She loves it!
Glimmer mist: Party Pink
Ink (heart): Worn Lipstick and Black Soot
Punch: Martha Stewart
Heart: Maya Road
Tag: Core'dinations
Heartshape pins: Unknown
As for Nicholas' card, I went with a more masculine look. Using the same mask, I glimmer misted the front and back of the card, and I added a very red heart that I wrapped with rafia! Simple, but pretty without being too girly...
Glimmer mist: Red Velvet
Ink (heart): Barn Door and Black Soot
Heart: Maya Road
Tag: Core'dinations
Rafia: Unknown
And here is the card I made for Scotty... very grungy! I used the same Maya Road hearts set, along with a small Tim Holtz grungeboard key that I completely distressed with all kinds of mediums: ink, crackle paint, pearl paint, and more ink! You should see my pretty fingers day... ;o). I also embossed the front of the card (Tim Holtz) , I inked it and finally, I sprayed it with glimmer mist.
Glimmer mist: Red Velvet
Ink: Barn Door and Back Soot
Hearts & 'love': Maya Road
Now, time to go celebrate Valentine's Day with my loved one!
Thanks for stopping by, and don't forget to spread the love!!
Saturday, February 4, 2012
The Creativity Rut, the Bad and the Ugly... Merry Belated Christmas Everyone!
Who, among all of you, fellow scrapbookers, ever went through a creativity rut? Well, if you haven't, I envy you...
For the last 2 months, I have been dragging myself around, hoping that something would inspire me to go back to my favorite addiction. Anything, from colours, photos, papers, magazines to blogs and websites, left me completely blah. Even CHA didn't get me going... there was truly something wrong with me. I checked out articles like 'Getting out of a non-creative rut', and 'Get Out of the Scrapbook Creativity Rut!' but it didn't really help. How discouraged I felt....
And then, one night that I felt very frustrated and upset, I flew down to my scraproom to get some peace and quiet time. I grabbed some Christmas pictures I had handy and decided to create something out of them. Happiness, peace, relaxation... it all rushed back to my mind and my heart! Welcome back, I said... yes, I talk and sing all by myself in my cellar! How satisfying it was to finally recover these feelings that are so hard to describe. I scrapped until 3:00 am that night. Pure delight. And this is what I did:
This layout is about this tradition we have in my family to put our pj's on, make hot cocoa for the kids, and coffee and Baileys for hubby and I, when the time comes to decorate our Christmas tree.
I made a lot of sewing on the layout; I used Sew Easy, it is really easy to use! You just need a little bit of patience.... I also used shimmery cardstock from DCWV (Neutrals), and paper from My Mind's Eye - Rosy Collection. I also used Jillibean Soup corrugated alphas that I stained with Picked Fence Distress Stain (Tim Holtz) and covered with Chandelier Tattered Angel glimmer glam, for a frosty look. I really like the result!
This was my first layout since the crop my friend Natalie held at her place early January. This crop was very special as we (the Divas, and a guest-Diva) decided to use the same Christmas kit for one-day crop. You can see our posts on Natalie's blog. All five of us have a blog entry... this is mine: 'One group kit, and amazing day!'.
My creativity rut was already acting up on that day, and all I have done was two layouts. Not productive at all, when you think I spent over 12 hours in my friend's house... This layout is about my goofy hubby wearing my son's elf tuque:
Lots of glimmer mist, drops of glimmer glam, heat embossing, massing distressing and inking, some sewing, and a lot of fun! This is my kind of layout: lots of work, lots of creativity and lots of happiness creating something from scratch.
My second and last layout of the day is entitled Christmas Cuddles, a title my friend Sylvie helped me find. Here it is:
This layout is all about love and tenderness. The best thing in life is my kids hugging me and me hugging them. Paper in this layout is also from My Mind's Eye - Rosy Collection. I used Maya Road snowflake chipboard that I covered with Adirondack Metallics Paint Dabbers in Pearl. This is my favorite colour in this paint collection. The little frame is from Pink Paislee Mistables, and I covered it with Be Positive glimmer glam, which my friend Natalie lent me. I love the result.
So, dear friends, if you get into one of these creativity ruts, don't be discouraged. It will come back one day or the other... in the mean time, enjoy doing other things!! You will soon feel like scrapping again!
Cheers, and thanks for stopping by!
For the last 2 months, I have been dragging myself around, hoping that something would inspire me to go back to my favorite addiction. Anything, from colours, photos, papers, magazines to blogs and websites, left me completely blah. Even CHA didn't get me going... there was truly something wrong with me. I checked out articles like 'Getting out of a non-creative rut', and 'Get Out of the Scrapbook Creativity Rut!' but it didn't really help. How discouraged I felt....
And then, one night that I felt very frustrated and upset, I flew down to my scraproom to get some peace and quiet time. I grabbed some Christmas pictures I had handy and decided to create something out of them. Happiness, peace, relaxation... it all rushed back to my mind and my heart! Welcome back, I said... yes, I talk and sing all by myself in my cellar! How satisfying it was to finally recover these feelings that are so hard to describe. I scrapped until 3:00 am that night. Pure delight. And this is what I did:
This layout is about this tradition we have in my family to put our pj's on, make hot cocoa for the kids, and coffee and Baileys for hubby and I, when the time comes to decorate our Christmas tree.
I made a lot of sewing on the layout; I used Sew Easy, it is really easy to use! You just need a little bit of patience.... I also used shimmery cardstock from DCWV (Neutrals), and paper from My Mind's Eye - Rosy Collection. I also used Jillibean Soup corrugated alphas that I stained with Picked Fence Distress Stain (Tim Holtz) and covered with Chandelier Tattered Angel glimmer glam, for a frosty look. I really like the result!
This was my first layout since the crop my friend Natalie held at her place early January. This crop was very special as we (the Divas, and a guest-Diva) decided to use the same Christmas kit for one-day crop. You can see our posts on Natalie's blog. All five of us have a blog entry... this is mine: 'One group kit, and amazing day!'.
My creativity rut was already acting up on that day, and all I have done was two layouts. Not productive at all, when you think I spent over 12 hours in my friend's house... This layout is about my goofy hubby wearing my son's elf tuque:
Lots of glimmer mist, drops of glimmer glam, heat embossing, massing distressing and inking, some sewing, and a lot of fun! This is my kind of layout: lots of work, lots of creativity and lots of happiness creating something from scratch.
My second and last layout of the day is entitled Christmas Cuddles, a title my friend Sylvie helped me find. Here it is:
This layout is all about love and tenderness. The best thing in life is my kids hugging me and me hugging them. Paper in this layout is also from My Mind's Eye - Rosy Collection. I used Maya Road snowflake chipboard that I covered with Adirondack Metallics Paint Dabbers in Pearl. This is my favorite colour in this paint collection. The little frame is from Pink Paislee Mistables, and I covered it with Be Positive glimmer glam, which my friend Natalie lent me. I love the result.
So, dear friends, if you get into one of these creativity ruts, don't be discouraged. It will come back one day or the other... in the mean time, enjoy doing other things!! You will soon feel like scrapping again!
Cheers, and thanks for stopping by!
Monday, January 2, 2012
Reorganize to optimize!
Hello Friends! First of all, Happy New Year to all of you!
This Christmas, my dear hubby offered me a shelving unit I've been wanting for quite a while.... It is an Ikea Expedit shelving unit, with compartments that can hold 12x12 containers! So I was gladly able to finally classify and organize my scrapbooking kits, papers and cardstock in some logical order for the first time in years! YAY!
As much as I LOVE scrapbooking, my second favorite activity is probably to organize my stuff, or my 'stash' to use an expression from the industry. I draw real pleasure from putting my tools and stash in order and make it more efficient to use. So, here are a few pics to show you how I organized my stuff to start 2012!
I tried to gather my tools, stamps, inks, papers, bling, etc. in a efficient way so I save time when I look for something. So here are all my punches in one big basket that fits into one of my shelf compartment.
This Christmas, my dear hubby offered me a shelving unit I've been wanting for quite a while.... It is an Ikea Expedit shelving unit, with compartments that can hold 12x12 containers! So I was gladly able to finally classify and organize my scrapbooking kits, papers and cardstock in some logical order for the first time in years! YAY!
As much as I LOVE scrapbooking, my second favorite activity is probably to organize my stuff, or my 'stash' to use an expression from the industry. I draw real pleasure from putting my tools and stash in order and make it more efficient to use. So, here are a few pics to show you how I organized my stuff to start 2012!
I tried to gather my tools, stamps, inks, papers, bling, etc. in a efficient way so I save time when I look for something. So here are all my punches in one big basket that fits into one of my shelf compartment.
My ribbons are wrapped around 6x6 foam pieces, by colour or theme (lace, rick rack, Halloween, etc.). My brads are also stored together, in individual containers. So when I leave for a crop, I gather the little jars and foam pieces I need, using minimum space in my bag!
In the same compartment are my Close to my Heart ink pads together with my acrylic stamps. Along with my new shelving unit, my husband bought some dividers, allowing to store smaller items while using maximum space.
I also have a couple of transparent bins that can hold my 12x12 paper. So I organized patterned paper by colour and style (girly, boyish, vintage, neutral, etc.). I did the same with the kits and cardstock.
These nice little wooden boxes are actually cigar boxes! They are so cute... I bought them for $2 each the last time I picked up cigars for my husband in a specialty store. I find them perfect to store extra ribbons, rolls, and what not.
And one of the best thing about this shelving unit is that it can host my albums, until they are complete and ready to graduate to the living room!
Finally, here is what I call my 'get dirty space'. This is basically a portable island I bought many years ago at Ikea, and that I converted to a scrap table where I can mist, ink, paint, spritz, you name it. I lay a Tattered Angel craft mat on top of a thick shower curtain that actually protects the wood of my table. Perrrrfect!
So I hope you enjoyed this post, and my tips and tricks to get organized for a new year of crazy scrapping!
Thanks for reading!
Subscribe to:
Posts (Atom)